|
How to Build a Shuttle PC
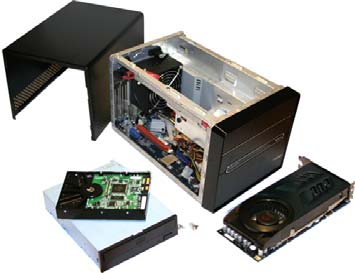
Parts needed to complete the job:
Processor/CPU - (Intel or AMD depending on model) Consult the CPU compatibility list for your model
Memory - (DDR2/DDR3 depending on model) Consult the Memory compatibility list, if you need help
Optical Drive - CD/DVD or Blu-Ray (SATA preferably)
Hard Drive(s) - SATA Either 3.5" or 2.5" (SSD drive can be used to boot from)
Discreet Graphics Card - Full size Single or Dual cards will fit (Just know that a Dual card will cover the PCI slot and make it un-useable) Consult the Graphics Card compatibility list - Some Graphics Cards will need additional power, so a Power Supply upgrade kit might be needed.
This is all the parts you will need to complete a system.
Start the Build:
Remove the Cover - Unscrew the 4 thumb screws on the back, remove cover
Inside the Case:
Remove the Disk Drive Rack - Unscrew 2 screws, slide the rack back and lift out
Remove the ICE Cooling system - There are 4 screws over the processor socket and Fan screws on the back of the case. Unplug the Fan from the motherboard. Completely remove the cooling system
Install the Processor - Push the lever to unlock and open the cover on the processor socket. Put the processor into the socket, be sure to align properly. Close the cover and re-lock with the lever.
Use the "Heatsink Compound" (included with the case) Apply a small amount to either the top of the processor or the bottom of the cooling system plate that rests on top of the CPU.
Re-Install the ICE Cooling system - Don't forget to re-plug in the Fan on the motherboard.
Install Memory - There are 2 or 4 slots depending on model. If your model has 4 slots be sure to install the memory in the correct order, if not filling all 4 slots - See the included Instructions
Install the Discreet Graphics Card - Remove the slot cover by unscrewing 1 screw on the back of the case. Align graphics card with PCI-e slot and gently push down until it clicks in. If you are going to install a PCI card, do that now also. Once your card(s) are installed, put the screw back into the back of the case.
Install Optical drive and Hard drive(s) - Take the drive rack you removed in the beginning and slide in the drives and attach each with the provided screws. When installing the Optical drive be sure to push the drive forward enough so the button will be activated by the drive button on the front of the optical drive door.
Plug in the SATA cables and power cables to the drives and put the rack back into the case.
Now, you are done and ready to install the Operating System.
First get into the BIOS, by hitting the DEL key several times upon first start up (at the Shuttle splash screen). Adjust the date and time and make the "First Boot device" the CD/DVD or Blu-ray drive. Then "Save and Exit" the BIOS.
Be sure and insert the Operating System CD into the drive to begin installing that.
Note: If you install a Discreet Graphics card and the Processor/CPU has integrated graphics, the integrated graphics will be disabled. So, be sure to plug in the Monitor to the Discreet Graphics card port.
Cover removed
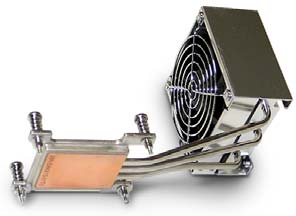
ICE Cooling system and bottom plate for Heatsink Compound
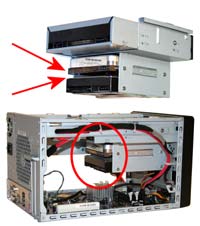
Drive Rack for Hard Drives and Optical Drive
  |